
I recently had the good fortune
to discover the wonderful work of Stanislav Klabík. Stanislav is not only a
very talented individual but he also happens to be a big fan of Heartbreak
Ridge. I was lucky enough to contact Stanislav who kindly told about his work.
Among his 3D modelling, Stanislav also produced some striking images – all of
which just had to be seen. But firstly, I’ll let Stanislav explain his story:
Hi all, my name is Stanislav
Klabík and I would like to show you the process of making of my latest personal
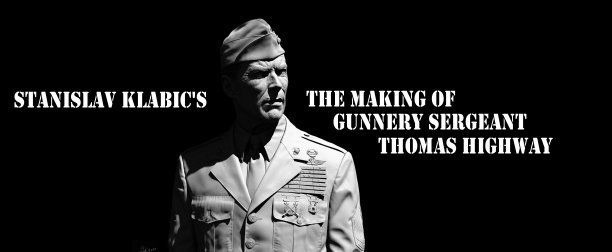
project named "Gunnery Sergeant Thomas Highway".
I really like the movie Heartbrake
Ridge where Clint Eastwood plays a really tough drill instructor who is in war
with marine corps in his platoon so I decided to make a some nice portraits of
him.
Modelling - I used a simple head
model for the first modelling. When I was satisfied with the result, with the
base proportions of Eastwood´s face, I used this high-poly model for modelling
a new topology with using the great Polyboost scripts. I used a bit heavy
polycount for his head to achieve all major proportions of his face, because I planned
to make some facial animations.

Then I made a simple rig for the
head and turned his head to different position, and then I took this model to
Mudbox and added all details like wrinkles, pores etc. I didn´t used the
displace for final render, because there was a huge difference between the
FastSkin + Displace and between the FastSkin without displace implemented,
don´t know why, but these shaders looks totally different in quality despite
the same settings. The hairs and the facial fur like the eyebrows etc. were
made using the incredibly slow Hair and Fur using a several maps to modify the
hairs placement, length, thickness.

Then I started a modelling of the
cloths, I used the same screens from the movie as for the head. The hardest
part were the ribbons and his badges, because I am not skilled in marine corps
awards and the screens were too small to see what awards he has, I spent quite
a long time with looking on the screens and with searching for right awards
using right words via Google.


The metal badges were modelled
really quickly, I used googled images, tweaked them a bit in Photoshop and then
used them as a stencils in Mudbox. Then I tweaked the model for better shape
and details, exported selected polygons and that´s all, really quick way how to
do these types of things and with great quality.
Background is based on the movie
too; I changed only some small details. Some peoples were confused why I used
so many polygons for windows and some other parts. That´s was beacause of
quality; final render was a bit blurred because of DOF, but there were a
difference between the renders with background with sharp-edged objects and
between the background with chamfered and smoothed edges. And I want as much
quality as possible so I that´s why I used so many polygons for this simple
background.

Texturing and Materials - I did
texture only for head and ribbons, for head I used colour, specular and bump
map. I used only overall colour slot in FastSkin material, but you must know
what you are doing when you are using only this slot. I used only one color or
the mix of two colours for the rest of the colour slots in FastSkin material.
When I matched all colour tones
of his faces I did the rest of the maps. Textures for ribbons were really
simple, only colours, everything else were made in geometry.

For clothing I used again the
FastSkin material with simple cloth texture with pattern, this provide the soft
look and together with the small strong bump provide the soft fuzzy look.
Eye use FastSkin together with
the Raytrace material for the outer shell of the eye. Settings for the
reflections are quite similar as Max Edwin has in his Song Hye-kyo project.
Lighting - I used area lights; on
the screens you can see their positions. The left side windows and the right
side windows simulate light coming from the both sides of the room, everything
is the same as in the movie. Warm bulb light simulates warm light coming from
above. Back window simulate the light coming from window behind him. Light uses
the raytraced shadows.


Rendering - I used Mental Ray for
character and Vray for background. I am not skilled in mental ray interior
rendering and I didn´t want to waste my time with mental ray for interiors so,
I decided to use Vray and match both scenes settings. For character I used
camera with 130mm Lens.
Post - Production - In Photoshop,
I did lot of tweaks to achieve a little bit specific look of 80´s movies. I
tweaked the colour balance, added a grain, a little bit of chromatic aberration
and at the end I added lens flare effect using the great Knoll Factory tools.
But all the effect is only a small and decent, because bad use of lens flare
can kill your render sooner than you blink. I also added tiny facial fur, and
tweaked some details.


This was quite an old version of the project, the black and
white version (below) is a recent reworking and improved version.


I can't help thinking how wonderful these b/w images would have worked as alternative poster designs, they're incredibly striking. My thanks to Stanislav for allowing us to share this beautiful work. Be sure to check out his work at ArtStation here
Thanks also to Kevin Wilkinson
No comments:
Post a Comment